BIOS MCU update guide - UNSUPPORTED

The following is a guide prepared by community member @Kruisdraad. I have helped clean up the English a little bit and posted it here in three parts.

Note that this is not an official Phala team item and is not a supported procedure. It is public info which some may want to try to mod their systems. It requires deep-level tinkering in ways that probably violate system warranties and may make your system permanently unbootable. I cannot and will not provide support to those who use it: try at your own risk.

If you’re willing to take on the risk for yourself, feel free to read on.

BIOS MCU Hack Mod

by Kruisdraad

Disclaimer

This document, even if well prepared, contains very dangerous changes to your systems BIOS and might brick your system. Although some systems have a BIOS that allows recovery if a firmware update is faulty, in some cases you can throw away your motherboard (CPU, RAM, HDD, etc. are not affected). You should not rush this and then slowly apply modifications and properly test it. The PHALA team does not provide support on this guide, does not support the process of editing the BIOS image, and cannot provide any support if you your BIOS is bricked. This document is just an effort to aid people with their BIOS problems who desire to take matters into their own hands. If your modified BIOS boots it does NOT mean it is working properly, your system might behave strangely… if you notice issues, install the original BIOS while you still can!

I (Kruisdraad) took a lot of time and effort into writing this, to support the community. I do not provide any support nor reply to PM’s. I could have kept this to myself, which would given me a nice advantage against the other miners, having one of the few Confidence Level 1 farms. But sharing this would improve the Phala network for everyone, so I’ve shared – if you use and extend the info here, share back!

This BIOS modifications guide COULD solve some problems, but not all of them. Do not complain if this guide does not work. The correct way to achieve these goals is to ask the motherboard/BIOS vendor to provide an update. Based on own testing on several motherboards and vendors it looks like about 80% of the issues could be fixed by following this guide (DO NOT SKIP STEPS!). Some vendors have special update tools which are not compatible with this guide. You might have to add your own wizardry!

Problem explained

So you are likely reading this because you don’t have a Confidence Level 1 miner, and really really really want one. You need to know a few things about the problem and the ideal conditions for getting a level 1 miner. There are several main criteria that need to be met:

  • Having hardware that supports Intel SGX. This does not only mean the CPU, but also the motherboard. Not every vendor implements this or provide support on missing features. For example, in my experience, MSI never provided any good support, while ASRock did epic support. Even then most BIOSes don’t have any BIOS options for Intel SGX, because it takes time to implement it and is not used on a large scale. You will have to invest time and money testing boards to get the build that works for you. Note that if a (US based) build works for you, it might not work for another (e.g. EU builder) due to versions in hardware. Do NOT assume that it works because someone else said so, there are no shortcuts.
  • Having the right SGX driver version. Intel releases new ones regularly to fix bugs and security issues. Keep in mind that the Phala scripts install the latest version at the moment of installation, but does NOT (yet) update them. In addition, you cannot simply update it. (hint: you must stop the EASMd service and docker containers, then run the uninstaller). To check the version you can issue ‘modinfo intel_sgx’ and look at the version indicator.
  • Having the right SDK version. You can update this at any time, but again has to be update manually at this time. There is no good way to check its version, when In doubt … just reinstall again.
  • Having up-to-date Intel Packages. During installation an Intel APT repository is added
  • Having an up-to-date BIOS that includes the latest MicroCode Update (MCU). Note that when downloading a new version from e.g. MSI, it might be listed as the newest version released by the motherboard manufacturer… but it may not contain the latest MCU for the CPU.
  • Having correct BIOS settings for your motherboard. This varies per vendor per board and requires persistence in checking each one of them, however a few common ones: Disable GPU, Disable Hyperthreading, Disable Virtualization, disable any overclocking, enabling Intel SGX, etc. You may spend countless hours into debugging this, there is no shortcut.
  • Having good internet connection. No, it’s not about speed … it’s about connectivity to the Intel SGX IAS services, which play a major role in the Remote Attestation process. This might fail if you have packet loss, uneven bandwidth, or simply live in a place like China where the internet is filtered in many ways.

Even if all conditions are met, you are also dependent on code updates from Phala, which you have no influence over.

Before starting

Before doing BIOS modifications, visit your vendor’s website and CHECK if there is a BIOS update. In many cases there will be one.

If not, then contact your vendor and ask for an updated BIOS. In most cases, the support will help you, but you must provide them with all the information needed. If you contact a vendor, then explain:

  • You are using the SGX feature, which the Remote Attestation states vulnerable, listed as per the Intel SA’s. The SA numbers are listed in the SGX-test from the PHALA tool, so put them in your request!
  • You require a Micro Code Update, also known as MCU. Details on what an MCU is are listed in this document, but in short it’s a little file inside your BIOS that patches your CPU. It allows Intel to fix bugs; your vendor should know which MCU’s are correct for your motherboard.
  • Explain that OS-level MCU patching (from Windows or Mac or Linux) does not work for Intel SGX. As Intel SGX is a security feature that an OS is unable to influence, so any MCU patching from within OS will not apply to Intel SGX features. The ONLY way to patch Intel SGX using MCU is loading it in the BIOS.
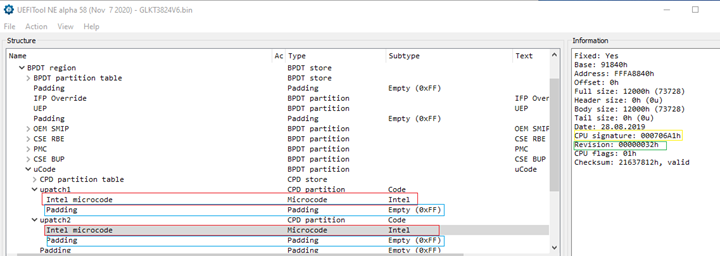
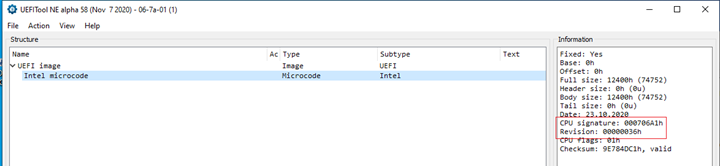
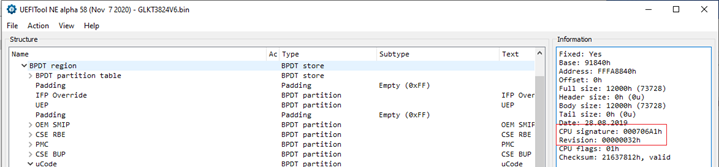
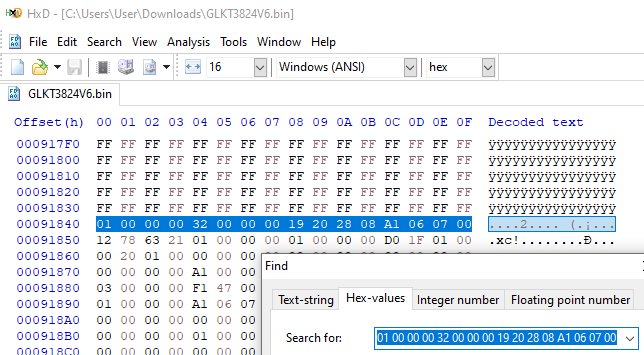
About Microcode

To put it simply: the Microcode is the software that runs the CPU. Some parts are always read-only (e.g. a serial number) while other sections are always writeable (e.g. changing boot order from your OS) … but the more tricky ones are both read-only or writeable, depending on what state your system is booted in. Intel SGX as a security feature should not be tampered with, as such it’s read-only after BIOS boot, but before BIOS is booted you can load a new MCU via a BIOS update, fixing Intel SGX problems. The MicroCode is also signed by Intel!

Updating the MicroCode (aka “MicroCode Update,” or MCU) can be done from two levels:

  • Loading it via the Operating System
    This allows easy patching pf some problems from Intel, as it’s less invasive. For example, Spectre & Meltdown were patched in most cases from the OS. However, there is a limitation: not all CPU functions can be updated while once they have already started (like SGX). While the OS in most cases gets the latest MCU and loads it, it only applies to CPU features the OS can handle, so it does not solve your SGX problems. When you run a Secure Enclave in the CPU, it will use the MicroCode from the BIOS, not the OS. The OS cannot change the microcode used by the CPU for SGX; this is part of what system secure! When you ask your OS what MCU you are running, it will report the latest MCU, which is correct from the OS perspective… but this is false information from the perspective of SGX features. There is no good way to checking from the OS what MCU is loaded from the BIOS.
  • Loading it via the BIOS
    This allows full patching of all features, before control is handed over. It is the only good way for Intel SGX.
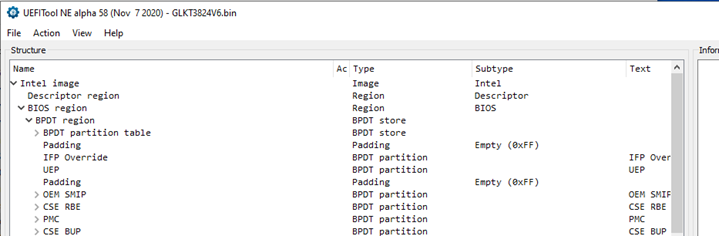
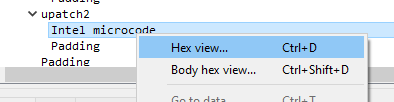
About BIOS files

To keep it simple, just think about your BIOS update file as a ZIP file. It contains multiple files (where the MCU is only a small part) to update all the items of your motherboard. All BIOS files since 2015 work the same way, but they contain hardware-specific configurations and only include what is needed for your specific hardware to limit space requirements. Because of this, BIOS files are not interchangeable, so if you download a BIOS file you must make certain it is for the motherboard you are using it for. Some (cheap) vendors may not have implemented any validation; they may allow you to flash an inappropriate BIOS file which might brick your system!

4 Likes

Download tools and resources

This 3-part guide is written for Ubuntu 18.04, which is the preferred OS for PHALA mining, but will also require the use of a Windows machine.

You will need to download:

Finding out your MCU level

First you go to the vendor’s website and download the latest BIOS and update the BIOS (do not skip this!) using your vendor’s guide on updating. This should be straightforward. (If you find this daunting, don’t bother with the rest of this guide; this job is not for you.)

Then go to a Windows workstation, which can be any machine. Now start the EUFITool and open your BIOS file (file → open image file). Although there are many different layouts, they generally look similar. The two most common setups are:

As we said before, just think about this as a ZIP with a directory structure. You can expand out this structure:

The more tricky part, as each BIOS is different, is finding the MCU we are looking for, which could be at any location. You will have to search for it. There are two common names you search for: uCode and uPatchX (where the X is a number from 1 to 9). And no, the search option often does not work, so you will have to manually scroll around until you locate the correct item.

When you locate the MicroCode regions, it should look something like the image below. I have highlighted some important parts here:

  • Red: this is a part containing a MicroCode Update (MCU)
  • Blue: this is padding, or free space. To update the BIOS without having to regenerate the whole thing, free space is left there. Adding a slightly larger MCU will use up some of the free space; putting in a slightly smaller MCU will leave more free space. Either way, the rest of the BIOS is unbroken.
  • Yellow, CPU signature: the exact CPU version to which the selected MCU applies. This is explained more in the section ‘finding the right MicroCode.’
  • Green, Revision: The version of the currently selected MCU (there may be different versions for different CPUs supported by the motherboard.)

Note: A BIOS file, like in this example, will likely have more than one MCU. Sometimes there are entries for multiple versions for the same CPU, sometimes there are entries for entirely different CPUs. High-end motherboards which support many CPUs can have many MCU’s listed here.

In the example above we see a version of 00000032h (32 in hex), while at the moment of writing is the latest MCU for this Intel CPU is 00000036h (36 in hex), so we can see this BIOS file contains an outdated MCU.

Finding your CPU signature

The next parts we will do on your miner, which you prepared with Ubuntu 18.04. SSH from your Windows workstation into the miner or perform the following from the miner:

root@miner:/root# cat /proc/cpuinfo | grep microcode | sort | uniq

microcode : 0x32

^^ Notice here a similar format; we can see a 0x32 (32 in hex). However, this is the OS level MCU, which may already be 0x36 as this stage. Even if it reports a version that is up-to-date, it says nothing about the actual level in the BIOS which will apply under Intel SGX. Always ignore this value (!)

root@miner:/root# cat /proc/cpuinfo | egrep '(cpu family|model|stepping)' | grep -v 'model name' | sort | uniq

cpu family : 6
model : 122
stepping : 1

^^ These three elements, family, model, and stepping, make up the CPU signature. However, we would them in hexadecimal value, which can be provided by the following command:

root@miner:/root#** **printf "0%x-%x-0%x\n" 6 122 1

06-7a-01

^^ Notice the version and write this down, you will need this later.

It is imported to understand that this is your CURRENT CPU signature. Your motherboard may support multiple CPU families, and if you swap the CPU, the signature could change. This guide only replaces the MCU for the current CPU, if you replace your CPU you will have to repeat ALL the steps from the beginning (!)

Downloading new MCU

Now you have the CPU signature, you will have to visit the Intel GIT repository (https://github.com/intel/Intel-Linux-Processor-Microcode-Data-Files) and navigate to the folder intel-ucode . Here you see a long list with similarly formatted CPU signature names. In our example we will only need to download the file called ’06-7a-01’ and nothing else.

After downloading this MCU file, you can verify by opening it with the same UEFITool used earlier. It will display the same thing, just with a smaller tree, as its file only contains this MCU.

The image of this MCU file shows the Signature, but with a new revision (red highlight).

The image from the full BIOS file shows the same signature and older revision (red highlight).

Now we know that the MCU we download is the newest version and matches the CPU we are using. We can also see that the checksum is valid; even though we are modifying this BIOS archive, we are not modifying the inner file itself. We are replacing it with a newer version, thus keeping its signing and checksum intact.

2 Likes

Locating the MCU location

For this 3rd part of the guide, you might wanna grab a coffee, make sure you are awake and fresh … now the tricky parts begin!

Go back to the UEFITool your BIOS image open, and select the uCode upatch region of the CPU signature we are replacing. Then open the HEX view:

image

image

You are looking at the first line (row offset 00000) of the MCU that is inside your BIOS file in hex format. Notice the 5th section hex pair is 32, which is the version of the MCU (00 00 00 32). This line is unique as far as I can see, so it’s the line we are going to look for. Note that the last four hex pairs (the 13th through 16th) at the end of the row are A1 06 07 00, which is how it store the CPU signature for 00 07 06 A1 (the same for hex pairs, but in reverse order). This should match the signature and revision you noticed earlier. If this does not match STOP and do NOT continue, you made an error or you cannot modify this BIOS with this guide.

Now start the HxD editor and then open your BIOS file. The use the search option (make sure it’s set to the Hex-values tab) and find the entire first line of the old MCU inside the BIOS:

image

^^ Notice the 00091840 offset, write this down … you will need this later.

Notice that this particular MCU is deep down in the full BIOS file; this hex offset tells you exactly where it starts.

Now in the same HxD editor open the 06-7a-01 Intel file you downloaded, which will open in a new tab. Then select ALL the content from the 06-07-A1 file by hitting CTRL-A (select all) and copy it with CTRL-C (copy selected). It should look like the image below:

image
Now carefully take note of the length, this is very important for the next step!

Go back to tab for the full BIOS file (GLKT3824V6.bin in this example). Set your mouse pointer to the beginning of the MCU file line we searched for (starting at offset 00091840) and then hold the SHIFT key and scroll down (do NOT release SHIFT). Notice in the lower corner how the length changes. Alternately, you may find it easier to use the PgDn key. Either way, you must select a length of 12400, exactly as found in the new MCU file size. You can click on a line to see how far you are, until you reach that point, but don’t let go of the Shift key. Note that the 12400 length is in HEX, so yes, it’s a long way down. (Each row is 10x pairs; that’s 16 as a decimal number, the way we humans count. Going down 1240 hex rows is 4672 rows in decimal.)

Protips: If you hold down the left mouse button on the lower part of the scrollbar you’ll see random characters scrolling by, but at some point you will see only FF values. That is whitespace. The point you’re looking for is generally near where the whitespace begins.

Once you have found position 12400, select to end of that offset line, as shown below. Make sure the selected area has a length of 12400. If you select a wrong length you should get a warning later.

image

When it all looks perfect you can hit CTRL-V (paste). Pasting should NOT generate ANY errors or warnings. (If it does, STOP, you made an error. Restart from the beginning!) If it worked, your screen should look like the below image.

image

Notice there’s less whitespace now (some FF sections got overwritten by red stuff we pasted). That is expected, as most often the new MCU is larger. This was planned for with the whitespace here. If you don’t see FF lines at the end, you likely selected the wrong area, and should restart. (It’s conceivable that the new MCU is slightly shorter than the old one, in which case you might need to manually overwrite the end of the old MCU with FFs, but if you appear to be in that situation, it’s more likely you’ve made an error and you should double-check everything else first.)

Now save the new BIOS file under a different name.

Validating the BIOS image

Once you saved your modified BIOS file, we can open it in the UEFITool. Navigate to the uCode / upatch2 region you just replaced, and review the information.

On this view, you should check several things:

  • The full size, 12400, for the new MCU, as opposed to the 12000 of the old MCU
  • The date is now more recent
  • The CPU signature still matches the ID we expect
  • The revision has changed to 36 (00000036h) which is newer then the old MCU (00000032h)
  • The Checksum matches what you saw in the UEFITool when you verified the 06-7a-01 file
  • The Checksum still reports as signed and valid.

If you see all of the above, and all match your notes for these elements, then congratulations! You have now patched the BIOS with a newer MCU.

Protip: Although not covered by this guide (and we will not support or answer questions on this), you may have noticed all the other regions in your BIOS file. Some are for the BIOS default settings. You can put yourself into “expert mode” now and modify the settings manually, e.g. if you do not have the option to enable SGX in the BIOS, you can make it the BIOS default. After flashing, you can enter the BIOS and tell it to ‘use factory defaults’ or ‘use BIOS defaults’ option to reset settings using the BIOS file, which includes your settings. Therefore, even though the BIOS has no menu option, you can still modify it.

Flashing the BIOS

This is dangerous and might brick your system. Make sure you’ve done all the steps exactly! If you skipped any step or made an error, your system might not boot anymore! Even if all went good, your system might brick.

You can copy the new BIOS file onto a FAT32-formatted USB drive and take it to your miner. Then follow the regular BIOS flashing guide for your system as documented by your vendor. KEEP A CLOSE EYE DURING UPDATING FOR ERRORS! If the flashing is successful and error-free, run extensive tests, like cpu burn, memtest, iperf, etc. to make sure the system is stable. If you think it is stable, then boot up in Linux and run the SGX test again.

But if there were any errors , you do not reboot or shut down. Instead, immediately flash the official BIOS from the vendor again. This prevents bricking (which can sometimes happen after you power-down with a bad BIOS flash: it can’t turn on again!) After safely putting back the official BIOS, go back and look to see where you went wrong in the process.

Once you’ve completed the BIOS update, you should run the phala sgx_test tool again to confirm the Confidence Level of your miner, and if all went perfectly…

… if you’re lucky, the Confidence Level will be 1.


End of Guide

2 Likes

Video walkthrough of this guide …

3 Likes