Check mk is a powerful system monitoring tool. It allows you to monitor and health check any operative system that you could think of. Even the most exotic distributions.
This is a tutorial to show you how you can monitor the NIC of the docker interface and your physical NIC in order to minimize unresponsive time of your worker. It supports alerts… and even push notifications.
I’ve chosen this monitoring tool to test because it is very user-friendly and doesn’t require too much of technical configuration, but just basic knowledge of linux commands.
Prerequisites
Having a separate Ubuntu 21.10 deployed and ready (or any of the supported distros for check-mk).
Let’s get started:
I will use Ubuntu 21.10 in our scenario.
From the server side
- Download check mk from the link below and choose a the version depending on your Linux OS:
We are going to use the free edition.
The downloaded deb should be something like: check-mk-free-2.0.0p0_0.impish.amd64.deb
-
Once you have succesfully downloaded your check-mk, move it to the /opt folder.
-
Next run this command: sudo apt install -f ./check-mk-free-2.0.0p0_0.impish.amd64.deb
- all the dependencies will be installed.
- To test that the installation went through on the server, run this command:
omd version
-
At this point, we will need to deploy what we call a “site”. This is going to be our web-based interface from where we are going to monitor our miner instance (which will be our target(client) machine.
-
Issue this command: omd create phala_miner
- On the terminal, you will see that a user called cmkadmin is created with a random password. Copy the password to the clipboard.
-
Start the site with the command: omd start phala_miner
-
At this point, we have created our server machine with the web-based site that will be used to administrate and monitor our target machine.
To find out the IP of the created site, open a new terminal on another tab and issue the command ip a
usually it should be something like: 192.168.65.0/24 depending on the allocated ip address allocated by your virtual NIC from VM Ware.
-
GIven that 192.168.65.100 is the local ip address of the server, go to a browser and type in the address: http://192.168.65.100/name_of_the_site (in this case phala_miner)
-
You will be prompted to use your username, which is cmkadmin and the password is the one generated at step 6.
-
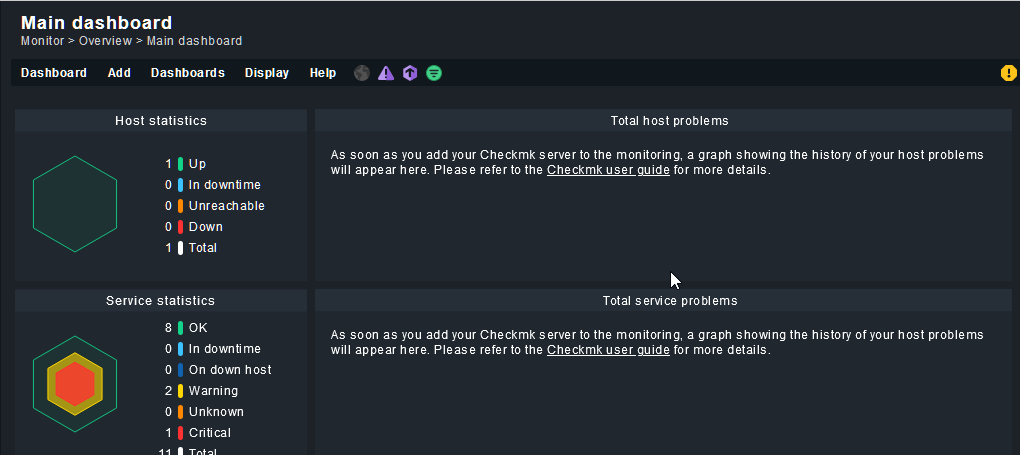
You will land in the GUI interface of the monitoring tool:
-
First thing that you should do, is change the default password of the cmkadmin user.
-
Next, download the agent by going on Setup > Agents > and clicking on the deb package icon.
-
Download the agent package in the client (target) which is our miner
You can achieve this by doing: scp check-mk-agent_2.0.0p23-f4ee9eaf2030da18_all:/tmp root@miner-machine-host-ip
- Enter the password of both the server machine and then the miner machine.
-
On the target machine, you will see check-mk-agent_2.0.0p23-f4ee9eaf2030da18_all has been added.
-
Same as we installed the server, run a ** apt install ./check-mk-agent_2.0.0p23-f4ee9eaf2030da18_all.deb**
-
Back to the monitoring website, go to Steup > Hosts > Add host:
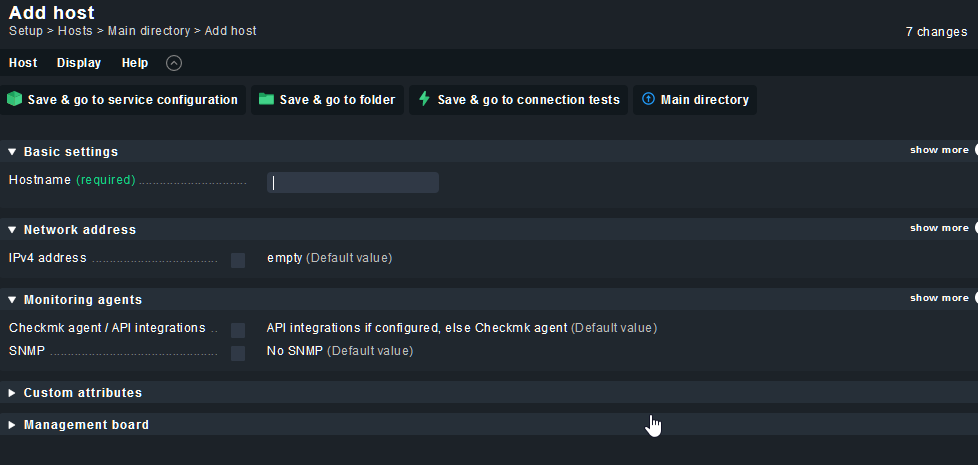
On the ipv4 address field, enter the target machine where you installed the agent.
- Click on “Save & go to connection test” and make sure that ping, agent and traceroute tests are green. SNMP is not important, we are using an agent to extract our data, so SNMP is irrelevant here.
Here is an exemple output of the succesfully installed agent:
<<<check_mk>>>
Version: 2.0.0p23
AgentOS: linux
Hostname: phala-miner
AgentDirectory: /etc/check_mk
DataDirectory: /var/lib/check_mk_agent
SpoolDirectory: /var/lib/check_mk_agent/spool
PluginsDirectory: /usr/lib/check_mk_agent/plugins
LocalDirectory: /usr/lib/check_mk_agent/local
- Run a full service scan.

- Finally you can see the state of the CPU, NIC interfaces of docker and your physical ethernet:

(!) Note:
If your target host fails to connect to the check_mk server, then you probably need to open default ports on the miner machine.
To maximize security, i strongly suggest you only open the ports to the server local IP and nothing else.
To do this:
On the miner host, issue these commands (where 192.168.0.0/32 is your miner host ip address):
**sudo ufw enable**
**allow from 192.168.0.0/32 to 192.168.65.100/32 port 6556 proto TCP**
Posted by illyrianw#6065